

What you will need:
* Lace - I got mine from Jo-Anns. The crocheted soaks up the stiffener easier than the nylon kind. You can buy it by the yard or by the spool. I only needed 18" for Lillians little head so I bought it by the yard. I got 6" longer just encase! Ya never know!
* Fabric Stiffener
* Metallic Craft Paint
* Paint Brush
* Wax or Parchment Paper
* Fine Glitter (I love Martha Stewarts!)
* Hot Glue Gun
* Scissors
* Small Bowl
Directions:
1. Cut your lace to the appropriate size. For newborns it is usally 13" - 15". Lillians was 18" and she is 1 year. Older girls are usually 20" - 22".
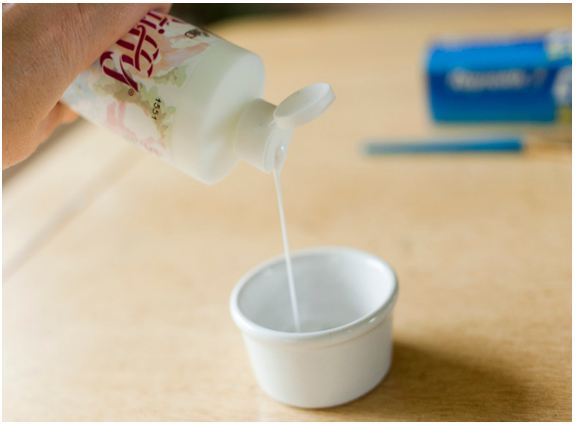
2. Pour your fabric stiffener into a small bowl.
3. Immerse your lace completely into the bowl soaking the entire length.

4. Wring out the lacy by pulling it through your pointer and middle finger letting the excess stiffener run back into the bowl.

5. Lay the lace onto a pieces of wax paper (or parchment) and dab the length with a paper towel, removing the excess stiffener so that it isn't clogging the holes in the lace.

6. At this point you can either let it air dry for about an hour, OR, if you're impatient I heard that you can cheat a little bit. You can turn your over on the lowest temperature it will go (175), and when it reaches that temperature, turn it off. Put the wax paper onto a cooling rack and place it into the over and shut the door. In about 20 minutes it will be dry. Or you can just wait an hour. Whatever you want to do.
7. Repeat steps 3-6 three or four times until your lace is stiff enough to stand on its side and sturdy enough to hold its shape.
8. Even though I blotted the lace I still have some glue that got in between my lace so I just got a push pin and poked around until it was like I wanted it.
9. Then peel it off the wax paper and place it on a new piece of wax paper. You're ready to paint! Grab your paint and of course pour it into a bowl for easy clean access. Using a paint brush, paint the backside first and then flip it over and paint the front.

10. Optional: I love anything with glitter and wanted Lillian's crown to have some sparkle! So, while the paint was wet I sprinkled it with glitter! I couldn't find the perfect color I wanted at the store so I mixed 3 colors in a bowl and got what the color I was looking for!

11. You'll need to let the crown either air-dry or oven dry completely
12. Once dry the ends tended to be frayed and sharp with all the stiffener on them, so I trimmed them up so they both had a nice smooth edge.
13. Then take your glue gun and add a dab of glue to one end and attach it to the other end. Try your best to match and overlap the pattern so the connection isn't obvious.
14. Almost Done! Once the ends are attached, take a cup that has a graduated shape (the top is wider than the bottom) and place the crown snugly onto it so that it forms the correct crown shape. (tops is a little wider than the bottom). I left my crown like that for a day or so because it will continue to stiffen as it "cures".
And Viola! You're done!

___________________________________________
GLITTERED 1's and HEARTS:
Now if you are wondering about the 1 you can always add any kind of embellishments that you would like.
If you wanted to add one like mine here is what I did.
I loved it so much that I also had "1's" all on the buffet table, hot coco bar, and on the bow as they came in the door. I decided to make more because they were so fast and easy! :)
What you will need:
* Cardboard or card stock
* Razor blaze or scissors
* Craft Paint or glue
* Paint brush
* Fine Glitter
1. I used cardboard for the base of my number. You can also use cardstock as well. Scott has TONS so I have it at my fingertips.
2. Trace what you want to draw on the card board.
3. Cut it out with scissors or a razor blade. I used a razor blade. It makes it a lot cleaner and faster. (Scott usually does this for me, but I did all my "glitter" crafts when he was asleep. For those of you who know him knows he's TERRIFIED of glitter! So to help keep his sanity I did my glitter crafts in the wee hours of the morn.)
4. BEFORE you paint go ahead and pour out your glitter onto some parchment paper. (this makes it easer and less messy you you do not get paint all over the glitter container)
5. Once you have your object cut out, it's time to paint. Take any kind of craft paint you have. I used my metallic paint I used for my crown and painted it on the card board. Paint the side you want to glitter. It can be a light coat as well. With fine glitter it doesn't need to be thick When paint is still wet press the object into the glitter. (I found it is easier and coats the object more when you press it into the glitter instead of sprinkling it.) Note: if your object is large you might want to glitter 1/2 way through painting so the paint does not dry.
6. Let the object dry and then paint the other side. I was impatient and only let it dry for 2 minutes then I did the other side. It didn't hurt it since the other side was covered with glitter.
And your done! Here are some of my pictures of some things I did.
Cake Heart Toppers

The card board worked out GREAT for the toppers.
Since cardboard has the corrugated center I was able to slip the skewers right in with no problem!
Little 1's by the centerpieces

Large 1's on the buffets.

Have fun!!
Cute! I kept looking at it and i thought you used fabric stiffener. Whats funny.. is it brought back a memory that i can't place. I remember watching someone make something like that for me when I was little. I have no idea who or where.. or why. ha Maybe at a daycare or a preschool? who knows! haha but it looked great!!! =))
ReplyDeleteI was surprised Scotty was okay with the super glittery crown! haha and I laughed out loud when I read that you made it in the wee hours of the morning. so funny!
AND HEY! GUESS WHAT?! NOVEMBER 1ST IS TOMORROW! ;) I have MANY count downs this month! We get to see ya'll (I admit i'm especially excited to see lillian and you) in 22 days as of tomorrow!